Friday, November 5, 2021

Installing Oracle 21c Express Edition on CentOS 7

Features of Oracle 21c:-
  1. Multi-tenant: Get isolation, agility, and economies of scale by managing multiple Pluggable Databases inside your Oracle Multi-tenant Container Database
  2. In-Memory: Support real-time analytics, business intelligence, and reports by keeping your important data in the Oracle Database In-Memory column store
  3. Partitioning: Enhance performance, availability, and manageability of your database with data partitioning that meets diverse business requirements
  4. Advanced Analytics: Get valuable insights and deliver predictions from your data using Data Mining SQL, R programming, and the Oracle Data Miner UI
  5. Advanced Security: Protect your sensitive data at the source and build end-to-end encrypted apps with layers of security including Oracle Transparent Data Encryption and Data Redaction

Limitations of Oracle 21c XE:-
  1. The Installer released by Oracle is only meant for 64-bit (x86_64) systems.
  2. It will consume, at most, processing resources equivalent to two CPUs.
  3. Only one installation of Oracle Database XE can be performed on a single computer.
  4. The maximum amount of user data in an Oracle Database XE database cannot exceed 12 GB.
  5. The maximum amount of RAM that Oracle XE uses cannot exceed 2 GB, even if more is available.

Now the steps for Installation for Oracle 21c XE:

1) Download the installer file named as "Oracle Database 21c Express Edition for Linux x64 (OL7)" (Size : approximate 2.2 GB) from the Oracle Website link given below:
https://www.oracle.com/database/technologies/xe-downloads.html

2) Switch to root user

sudo -s

3) Install the Database Preinstallation RPM . The Database Preinstallation RPM automatically creates Oracle installation owner and groups and sets up other kernel configuration settings as required for Oracle installations.

curl -o oracle-database-preinstall-21c-1.0-1.el7.x86_64.rpm https://yum.oracle.com/repo/OracleLinux/OL7/latest/x86_64/getPackage/oracle-database-preinstall-21c-1.0-1.el7.x86_64.rpm
yum -y localinstall oracle-database-preinstall-21c-1.0-1.el7.x86_64.rpm
4) Install the Database software
yum -y localinstall oracle-database-xe-21c-1.0-1.ol7.x86_64.rpm

5) Check your machine name
hostname
6) Edit the /etc/hosts file to include entry for your machine using the output of previous command

Sample File (before editing) :-
127.0.0.1 localhost localhost.localdomain localhost4 localhost4.localdomain4
::1            localhost localhost.localdomain localhost6 localhost6.localdomain6

Sample File (after editing):- here "mymachine" is your machine name
127.0.0.1 localhost localhost.localdomain localhost4 localhost4.localdomain4 mymachine
::1            localhost localhost.localdomain localhost6 localhost6.localdomain6
7) Configure the Oracle 21c XE installation
/etc/init.d/oracle-xe-21c configure

At the prompt, specify a single password for the SYS, SYSTEM, and PDBADMIN administrative user accounts. The same password will be used for these accounts.  Oracle recommends that the password entered should be at least 8 characters in length, contain at least 1 uppercase character, 1 lower case character and 1 digit [0-9].

After the configuration completes, the database and listener are started. 

8) add your user to oinstall group (here username is your user ID)

usermod -aG oinstall username

9) Exit from root shell 
exit

and then run below commands one by one to set environment variables for your username

echo 'export ORACLE_HOME=/opt/oracle/product/21c/dbhomeXE' >> .bashrc

echo 'export PATH=$PATH:$ORACLE_HOME/bin' >> .bashrc

echo 'export ORACLE_SID=XE' >> .bashrc

echo 'export ORACLE_BASE=/opt/oracle' >> .bashrc

echo 'export LD_LIBRARY_PATH=$ORACLE_HOME/lib:$LD_LIBRARY_PATH' >> .bashrc

10) Logout and login again to make environment variables active. That's all and you are ready to begin your journey with Oracle 21c XE database.

Wednesday, October 20, 2021

Installing a 1 GB swap in Ubuntu without partitioning

Some software that you install e.g. oracle database XE requires you to have greater than one GB swap space. So, if you have not created a swap partition of greater than 1GB just because you have lot of RAM, you may land in a fix so as what do now . Although  , in ubuntu , you can easily use GParted to create a new swap space but some times you don't have enough free space or don't want to take risk of using GParted . Also , GParted is not installed by default ( u can get it from Ubuntu Live Disk ). So, we need some process by which we can have some extra swap space without using GParted.


To install a 1 GB swapfile named swapfile in /  ( root directory) , use the following steps in the terminal :

1) sudo -s 
   ( to gain root privilage, its optional , but if you don't do this then you have to append sudo to each of the following commands )

2) dd if=/dev/zero of=/swapfile bs=1024 count=1048576  
   (this may take a while)  ( 1048576 == 1 x 1024 x 1024 , 1GB == 1048576 KB)

3) mkswap /swapfile
    ( ignore any error )

4) swapon /swapfile
     ( to turn on the swap )
 
5) cp /etc/fstab /etc/fstab.orig
    ( back-up the fstab before editing )

6) echo '/swapfile swap swap defaults 0 0' >> /etc/fstab
    ( adds the entry of  new swap to fstab for mounting the file at boot time )

7) To  Verify:

   swapon -a ; swapon -s

If at anytime u want to delete the swap then :

   sudo swapoff -a
   sudo rm /swapfile
   sudo cp /etc/fstab /etc/fstab.changed ; sudo cp /etc/fstab.orig /etc/fstab
   sudo swapon -a ; swapon -s

Saturday, July 10, 2021

Windows 11 - How to adjust Taskbar position

Hi Friends,

In the new edition of Microsoft Windows i.e. Windows 11, the taskbar along with start menu and search button has a new position i.e. in middle of the screen.

Taskbar in center

As per your preference, this might not be most desirable setting. However, Windows 11 currently provides you with choice to change it to left align or keeping it in centre.  

To do so, you can right click on the taskbar and select Taskbar settings.

Image showing the option to open Taskbar settings after right click on the taskbar

Clicking on the Taskbar settings opens corresponding Personalization settings in the settings app.

Image showing the Taskbar settings

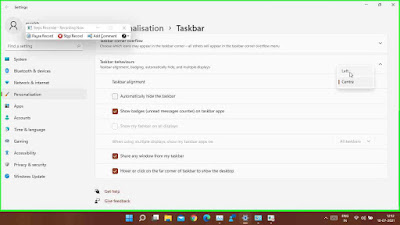
Now scroll all the way down and expand the "Taskbar behaviours" setting by clicking on it. This has an option named as "Taskbar alignment" which comes with a drop-down menu.

Image showing "Taskbar alignment" options
Using this drop-down menu you can toggle between Left and Centre position of the Taskbar .
Image showing "Taskbar alignment" options

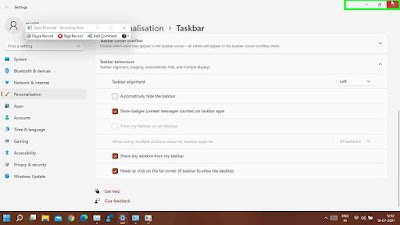
Once you select the "Left" position, the Taskbar will move to left position.

Image showing "Taskbar alignment" options with left selected

In case you want to revert back the Taskbar position back to centre, you can simply follow-up the same steps shown above to toggle to "Centre" position.

Please note that currently although it is not possible to move the taskbar to top or to left/right of screen, the feature is in high demand among the people who are testing the developer build of the Insider Preview of Windows 11. So, in future, we might be able to switch it to more locations.


Friday, July 9, 2021

Enabling TPM for Windows 11 on Dell laptop

Hello Friends,

As you all might be aware that Microsoft has announced its latest version of Windows i.e. Windows 11 during their recent event of 24th June,2021. 

This new version of Windows comes with lot of changes including a new look, a redesigned start menu, an easy to use settings app and new icons as well. 
Most importantly, Microsoft has build this new version with a focus on securing the Windows Platform. They have done this by introducing a mandatory requirement of having TPM 2.0 chip. Although, this could come as a setback for many of you, this has to be the way forward keeping in mind the recent exponential increase in cyber attacks. Specially, with a lot of people opting to "work from home" due to the covid-19 pandemic, this move of Microsoft is definitely going a lot of way towards building a secure environment.

So, how you can check if you are compatible with this new requirement from Microsoft for Windows 11 ? The easiest way to check it will be to open the run command by pressing the Windows button along with R ( Win + r ) and running the command tpm.msc. Please do note that executing this command would require elevated administrator rights.
Once, you run the command it will open the TPM module section of Windows management console and their you can easily see if the TPM chip is enabled or not along with the TPM version. 
In case, it shows a TPM module not detected screen, then also all hope is not lost as the TPM module could be set disabled via the BIOS or UEFI settings. To check this, simply reboot your laptop and press F2 function key to.enter the UEFI settings. From there look for either TPM or PTT in security settings, PTT is the intel format for the TPM. As per Dell knowledge base article , "Some Dell systems do not ship with a TPM(Trusted Platform Module) module, and instead, use PTT (Platform Trust Technology). PTT is a lower-cost solution that supports the same functions of the TPM. From an OS perspective, there is very little difference between how TPM and PTT interact with bit locker."
Under the PTT security settings,you can check if it is enabled or not. In case it is enabled, you will see the check box✅ against the PTT on.
If it is not selected then please do so to enable the TPM/PTT module .

Once, you have done this,once you login back to Windows 10, you can check the version of the TPM chip by re-running the tpm.msc command.

Once this is done, you have moved ahead one step towards installing/upgrading the Windows 11 on your machine.
 
Further reading ( External website Links ) :

Saturday, June 12, 2021

How to Recover admin password of Splunk

Case 1 (If you are on Splunk 7.1 or prior) :-

  1. Rename the file passwd in directory $SPLUNK_HOME/etc to passwd.bkp
  2. Restart the splunk service
  3. Login using username "admin" and password "changeme"

 Case 2 (If you are on Splunk 7.1+) :-

  1. Rename the file passwd in directory $SPLUNK_HOME/etc to passwd.bkp
  2. Create a file $SPLUNK_HOME/etc/system/local/user-seed.conf.
  3. Sample content :
    [user_info]
    USERNAME = admin
    PASSWORD =P@ssw0rd
      

  4. Restart the splunk service. This will generate a new passwd file.
  5. Now login using username "admin" and password "P@ssw0rd"
Note:- $SPLUNK_HOME is usually you splunk installation directory . For windows, it could be "C:\Program File\Splunk" and for linux , it could be in "/opt/splunk" .
 
Reference :- https://community.splunk.com/t5/Security/Splunk-Admin-Password/m-p/326020